|
eValid™ -- Automated Web Quality Solution
Browser-Based, Client-Side, Functional Testing & Validation,
Load & Performance Tuning, Page Timing, Website Analysis,
and Rich Internet Application Monitoring.
|
|
Machine Adjustments for eValid LoadTest Operation
eValid Home
Summary
When running LoadTest scenarios -- i.e. a loadtest.evl type playback script --
remember that you are asking eValid to launch each *.evs script in its own eValid browser.
Because eValid imposes NO limit on the number of browsers you can open with eValid's
LOAD LoadTest feature
it is fairly easy to overload your system resources.
The settings and adjustments described below should make it possible to achieve 100+ eValid instances.
For information about how to make adjustments
and run scripts that support larger numbers of instances,
beyond 1,000 BUs per machine,
please contact us for additional information.
Usual Symptoms
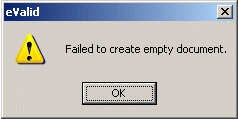
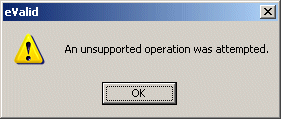
Warning messages (in the form of modal pop-ups)
from the Windows operating system like
"Failed to create empty document" or
"An unsupported operation was attempted"
are usually the result of an eValid LoadTest run
that is overloading the operating system in some way.
Note that neither of these error messages is actually from eValid per se,
but instead are eValid's response to requests made to the underlying operating system.


In most cases you can run up to ~20 parallel eValid instances
without seeing either of these messages.
With more than ~20 parallel eValid instances you will likely see these messages regularly.
Key Parameters
There are several key system settings:
Virtual Memory,
Desktop Heap,
Performance Options, and
Memory usage.
These system settings may need to be adjusted to get the best performance out
of eValid in LoadTest mode.
It is good practice to copy down and/or make backup files
of your default system settings
in case you need to re-establishing default settings.
Base Machine Description
The instructions to set Virtual Memory and Desktop Heap
settings were made using the following PC:
| Property | Recommendation |
| WorkStation CPU | Pentium IV 1.0 GHz or later |
| System Memory | 1 GB RAM or greater |
| OS | Windows 2000/XP/Vista/Windows7/Windows10 |
| Video RAM | At least 64 MB SDRAM |
|
The actual number you have to set Virtual Memory and/or Desktop Heap
settings to may vary due to hardware, OS, and LoadTest configurations.
Machine Adjustments
Here are the adjustments that need to be made:
- How To Set Virtual Memory Size
Applies to Windows 2000 Professional Edition, Windows XP, Windows Vista, and Windows 7, etc.
Here is the sequence to set the Virtual Memory Size.
For Windows 2000 Users:
- Right Click [My Computer]
- Select [Properties]
- Select [Advanced] > [Performance Options...] > [Change]
- Set Initial Size(MB): 900
- Maximum Size(MB): 900
- Click [Set] > [OK] and exit out completely.
- Reboot the machine to have changes take effect.
For Windows XP Users:
- Right Click [My Computer]
- Select [Properties]
- Select [Advanced] > [Performance] > [Settings]
- Select [Advanced] > [Virtual Memory] > [Change]
- Set Initial Size(MB): 900
- Maximum Size(MB): 900
- Click [Set] > [OK] and exit out completely.
- Reboot the machine to have changes take effect.
For Windows Vista, Windows 2003 (Enterprise Edition) SP2, and Windows 7 Users:
- Right Click [My Computer]
- Select [Properties]
- Select [Advanced system settings] with the proper permission...
- Select [Advanced] > [Performance] > [Settings]
- Select [Advanced] > [Virtual memory] > [Change]
- Click on [System managed size] to have Windows choose the best size of the paging file or Custom size to maximum available...
- Click [Set] > [OK] > [OK] and exit out completely.
- Reboot the machine to have changes take effect.
-
How To Set Desktop Heap Size
Here is the sequence of changes to be made to set the Desktop Heap Size.
- Select [Start Menu] > [Run] then type regedit and click [OK] button.
- In the registry editor select:
[HKEY_LOCAL_MACHINE] > [System] > [CurrentControlSet] > [Control] > [SessionManager] > [SubSystems]
- Right click [Windows]
- In the pop up menu select [Modify].
- In the editable dialog-box copy and paste the long
string into a text file using Notepad or some text editor
to save the setting as a backup.
- In the editable dialog-box use the arrow key
to scroll to the part of the string that reads:
| Machine OS |
Original Registry Setting |
Windows 2000/XP
Windows 2003 (EE) SP2
Windows Vista/Windows 7
Or Later |
SharedSection=1024,3072,512
SharedSection=1024,12288,512
SharedSection=1024,20480,768kkb
Etc. |
- Modify with by changing the parameter "3072" or "12288" to "16384" for 25+ parallel playbacks
or
change the "3072" or "12288" or "20480" to "32768" for atleast 50+ parallel playbacks. Your mileage will vary depending on your hardware/software configuration environments.
ADDITIONAL NOTES:
- The above was found by searching for "Heap Settings" and "Desktop Heap Settings" at
www.microsoft.com, where more recent information may be available.
- The three numbers above, "1024,3072,512" or "1024,12288,512" may vary from machine to machine.
Be sure to change only the second value ("3072") or ("12288"),
or whatever number is in its place,
to the numbers mentioned above,
or adjust the number that favors your machine and LoadTest needs.
-
You have to have enough system memory (RAM)
to satisfy the requirements of the previous setting(s).
-
You will have to try different settings using the above methods
as each machine, hardware, and OS, may be slightly different in its requirements.
-
Changing the Performance Options
Changing the performance options of Windows 2000 Professional can adequately
assist in allocating enough resources to aid in completion of LoadTests with
large numbers of browser to be opened.
To change the Performance Options in Windows 2000:
- Right click [My Computer]
- Click on [Properties]
- Click on [Advanced]
- Click on [Performance Options]
- Click on [Optimize Performance for Background Services]
- Click on [OK] and exit out completely.
- Reboot the machine to have these changes take effect.
To change the Performance Options in Windows XP:
- Right click [My Computer]
- Click on [Properties]
- Click on [Advanced]
- Click on [Performance] > [Settings]
- Click on [Advanced] in Performance Options.
- Click on [Processor Scheduling for Background Services]
- Click on [Memory Usage for System Cache]
- Click on [OK] and exit out completely.
- Reboot the machine to have these changes take effect.
To change the Performance Options in Windows Vista, Windows 2003 (Enterprise Edition) SP2, and Windows 7:
- Right click [My Computer]
- Click on [Properties]
- Click on [Advanced system settings] with the proper permissions...
- Click on [Advanced] > [Performance] > [Settings]
- Click on [Advanced] in Performance Options
- Click on [Processor scheduling for Background services]
- Click on [Apply] then [OK] and exit out completely.
- Reboot the machine to have these changes take effect.
-
Video Card Issues
LoadTest runs often are graphics-intensive processes.
There are known video card issues in such runs.
Tests which exceed more than a large number simultaneous playbacks may
affect the refresh rate of the screen and this may make the screen unreadable.
eValid build #172 and later used a different method for handling
allocation of Global Data Objects,
and the incidence of video card interaction failures are considerably reduced.
To ensure smooth operation
of 50+ simultaneous eValid browsers,
we recommend having at least 64 MB of RAM allocated for the video.
To check the amount of RAM your video card has installed:
For Windows 2000 Users:
- Click on [Start]
- Click on [Settings]
- Click on [Control Panel]
- Click on [Display]
- Click on [Settings]
- Click on [Advanced]
- Click on the [Display Type]
- Click on the [Adapter] tab.
The amount of RAM present with your video card should be
indicated here by Memory Size.
For Windows XP Users:
- Click on [Start]
- Click on [Control Panel]
- Click on [Display]
- Click on [Settings]
- Click on [Advanced]
- Click on the [Adapter] tab.
For Windows Vista Users:
- Click on [Start]
- Click on [Settings]
- Click on [Control Panel]
- Click on [Personalization]
- Click on [Display Settings]
- Click on [Advanced Settings...]
- Click on the [Adapter] tab.
For Windows 7:
- Click on [Start]
- Click on [Control Panel]
- Click on [Appearance and Personalization]
- Click on [Display]
- Click on [Change display settings]
- Click on [Advanced settings]
- Click on the [Adapter] tab.
The amount of RAM present with your video card should be
indicated here by Memory Size.
Other Operating Systems
The same basic instructions should apply without modification
for other versions of Windows, e.g. Windows Server 2008.
Contact Technical Support (eValid: Help > E-mail Tech Support) in
case you experience difficulties.
IE Connection Limit
Although this is a VERY rare issue,
here is the Microsoft KB article on
How To Configure Internet Explorer to Have More Than Two Download Sessions.

