|
eValid™ -- Automated Web Quality Solution
Browser-Based, Client-Side, Functional Testing & Validation,
Load & Performance Tuning, Page Timing, Website Analysis,
and Rich Internet Application Monitoring.
|
|
eValid -- Saving & Restoring Profiles
eValid Home
Introduction
eValid profiles are set within the eValid preferences.
They contain complete information about your current eValid setup.
This page documents how to save and restore profiles.
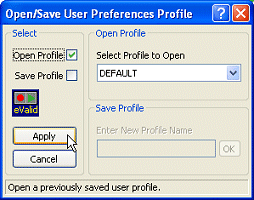
This is done from the Open/Save User Preferences Profile, shown here:

Saving A Profile
Saving a profile allows the eValid user to quickly save pre-configured
preference settings into eValid for future use.
To save your current eValid settings as a profile, follow the steps outline
below:
- From the eValid pulldown menu, select "Settings" and click on
the preference type and select the appropriate changes.
- As soon as the all the necessary options are set, simply click on the
"Profiles" button on the lower right hand side of the eValid
settings window to open the "Open/Save User Preferences Profile"
dialog box.
- Select the "Save Profile" check box to enable the "Save
Profile" textbox located on the lower right side of the dialog.
- Enter a profile name for the pre-selected options. Note that a profile
name cannot be less than two characters, contain a whitespace character or a
"tab" character.
- If the profile name entered is accepted, a status message at the bottom of
the dialog will inform the user of the validity of the profile name.
- Click on the "Save" button to save the existing settings in the
registry.
Restoring A Profile
Restoring a profile setting allows the eValid user to quickly load predetermined
preference settings in eValid without having to select each setting manually.
To restore a saved profile, follow the steps outlined below:
- From the eValid pulldown menu, select "Settings" and click on
the preference type.
- Simply click on the
"Profiles" button on the lower right hand side of the eValid
settings window to open the "Open/Save User Preferences Profile"
dialog box.
- Select the "Open Profile" check box to enable the "Open
Profile" pulldown listbox located on the right side of the dialog.
- Select the desired profile name from the list.
- Click on the "Apply" button to load the selected profile.
Restoring Profiles From The Registry
In some cases where a script fails to record or playback properly in another
machine and works perfectly on another, importing of the preference settings can
affect record or playback reliability.
Moving Profiles Between Machines
Follow the steps outlined below to export and import preferences to and/or from a different
machine.
This process will let you move a pre-defined profile from one machine to another,
and important capability when you have
multiple computers where eValid is installed and the all need to "run alike".
To save and export current profiles to a new machine environment:
- Start by clicking on "Start > Run" button from the windows
taskbar.
- Open the registry editor by typing "regedit".
- From the registry editor, navigate to the eValid section "HKEY_CURRENT_USER
> Software > Software Research > eValid > eV_UserProfile1".
- Right click on the folder of the desired profile to be exported and select
"Export" from the list of available commands.
- Enter the a name for the profile to be saved as and the path to the saved
file.
- Click on the "Save" button.
To import and save a registry setting, simply double click the *.reg file
saved and it will automatically install the registry settings in the correct
path.
